How to Mount Your Pictures
You have several options to choose from depending on which tools you have and how handy you are.
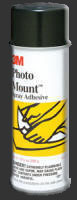
The most commonly available, recommended adhesive is 3M Photo Mount. It is a spray and sells for about $13.00 for a large can. One can should do quite a few prints. Other permanent adhesive that you might consider are 3M General Purpose 45, it is advertised as "Photo Safe" and cost about $5 at Home Depot. Also 3M Super 77 is slightly less expensive than Photo Mount, and the procedure for using it is the same. It is not advertised to be archival. I know several people who are using this and have been happy with it.
Apply the Adhesive
You first shake the can. Then holding the can about 6 to 8 inches from the print, spray the entire back of the print.
You can ensure better coverage by spraying once horizontally and once vertically.
Your mount-board should be ready before you spray the print. If you're doing this indoors, be sure to protect the area behind the print from over-spray. Newspaper should work fine. It should also be done in a well-ventilated area. The spray is not good to breathe.
Allow a couple minutes for the glue to become tacky before mounting.
If your board is already cut to its final size before mounting the picture, you'll need to be really careful in positioning the print. Once your print is properly positioned, you should apply pressure to the entire surface to ensure a good bond. Placing a sheet of paper over the print, before applying pressure will reduce the chance of smudging your print..
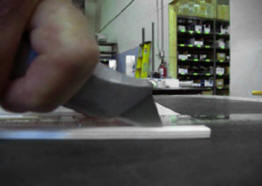
A Print Roller is the ideal tool for this task. Other items that you might use could be the smooth edge of a credit card or perhaps a plastic spatula. Use the tool like a squeegee and start at the center, working your way out toward the edges of the print. This helps

I find it easier to glue the picture to a mount-board that is a bit larger than my final intended size, and then trim the board. This way, the positioning of the picture isn't critical.

Trim the Board

Once you have your print mounted, you're ready to trim the board. Now, you want to get your cut right where you want it, and have a straight, smooth edge.
Some people are able to achieve good results with just a steel ruler and a sharp box cutter. If you decide to try it this way, it's best to have a new blade. Try to secure the ruler and mat so they don't move during cutting. If you can follow the edge of the ruler while keeping the cutter at about a 45 degree angle, you should be able to make a clean, straight cut. You need to apply a firm steady pressure on the cutter and try to complete each cut without stopping partway through. Be careful not to cut your good furniture, or worse yet, yourself, while you're doing this.
_260_435.png)
Michael's carries several items that will make the job of cutting foamcore easier. The easiest to use is a Matcutter. The Logan Compact Matcutter has a spring-loaded holder/guide to keep your board in place. The guide has a channel that the cutter fits into and keeps your cut straight. The Matcutter only comes with an angled cutter, so you need to buy the Straight-cutter separately. The Straight-cutter will slide along the channel of the Matcutter with the blade already correctly positioned to make a clean cut. Go to http://www.logangraphic.com/products/ for more information about their products.
Another item you might consider, if you need to save some money is call an Adapt-a Rule. It also has a channel that the Straight-cutter will work with. It also has a rubber strip on the base to prevent slipping.
If you're trimming a picture to be flush-mounted, I try to make my cut about 1/32 of an inch into the picture. Otherwise, if you trim a little too far from the picture, you'll leave a small white edge that doesn't look good. It's more difficult to re-trim just part of an edge, and still get good results.
Materials to Use
Prints
during the exhibition
Many of you are now printing your own photos on your home inkjet printers, with very good results. However, some dye-based inks don't start peeling off the mount-board during the fair. This is probably due to type of lighting in the building housing our exhibit.
During the course of the fair, you may notice fading in our inkjet prints. In some cases, the fading is extreme. Some of the newer Photo Printers use Pigment inks or other specially formulated inks that hold up much better during the fair.
If you don't want to risk fading, you might consider having your prints made at a photo lab. There are quite a few places around town to choose from.
A couple suggested places are Wal-Mart and Costco. Costco will make prints up to 12”x18”, and very inexpensively.
Another possible option is to use a protective spray to protect your prints from the UV rays of the lights.
Mount-boardsI recommend 3/16” Foamcore as the preferred mounting board. It has a smooth surface, is inexpensive, lightweight, and less prone to "Bowing" than most of the available pressboard type mount-boards.
Other than the foamcore, the only other type mounting board available in town is a double weight pressboard mount. Quite a few of these have been “bowing” during the fair. I haven't been able to determine whether this problem is specific to a certain brand or if the procedure used for the mounting is causing the problem.
There are heavier weight mount-boards that may be used, but they present a different problem for us. Because of the weight and slight textured surface of the board, our adhesive hangars don’t adhere as well to them and we've had them falling onto the floor.
Avoid self-adhesive foamcore board, as it tends to delaminate over time.

Prints mounted on mountboard, instead of on foamcore, may tend to curl or warp during the exhibit.
Other Items that might be helpful
Logan Compact Mat Cutter with a Straight Cutter. 

This is great for cutting foamcore, or regular matboard, but unless you use it a lot, it might be too expensive. (About $110 for the Matcutter plus $28 for the Straight Cutter).
Where to buy what you need
- 3/16" Foamcore: Michael's, Wal-Mart
- Double-weight mount-board: Michael's, A.V. College bookstore, Graphic Experience
- All of the above spray adhesives and mat cutting tools are available at Michael's. I could not find 3M 568 Positionable Mounting Adhesive locally. I know it is available at Freestyle Photographic Supplies in Hollywood and at numerous internet stores.
Places that will do it for you
If mounting your own prints is a bit more than you want to tackle, there are a number of places locally that will do it all for you. It's best to let them know that it's for display in the Photography Exhibit at the Fair. I spoke to the employees at each of these places and they all recommend using Foamcore rather than the standard mount-board for the Fair. Prices varied considerably, so you might want to shop.
- Art Plus Gallery is located in the A. V. Mall.
- Graphic Experience is on Lancaster Blvd in Lancaster.
- Michael's in both Lancaster and Palmdale. If you buy Foamcore there, they will make one cut for free. $1.00 each for additional cuts.
